Tuesday, December 21, 2010

Making Pom Poms...

There are a lot of people who have issues with pom-poms. I used to be one of them. Frustration each time I tried to make one of the stupid things, throwing scissors across the room, tossing the little plastic circles like ninja stars, you know, the usual. But, I liked the idea of using them as Christmas ornaments because the kids couldn’t break them.


I think my problem was the little disks that you can buy weren’t thick enough, nor were they big enough. Sure, they make great little bitty poms, but really big, substantial ones? Nope. So, here is my way to make the little buggers…

You will need: Yarn (I like using a chunky one – Homespun from Lion Brand works really well. It’s chunky, and frays really nicely when you are done), a big yarn needle, cardboard, scissors.
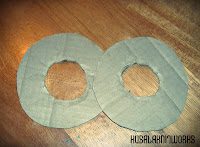


Step one: Cut your cardboard into circles… any size you want, but remember, this will determine the size of your pom. I make various sizes, anywhere from two inches across to five inches across for super big poms. Cut a second circle in the center. I usually stab the scissors right through the center and cut around. These don’t have to be perfect. This is a very forgiving project.


Step two: Thread your yarn needle with about 12 feet of yarn… pull straight through so you have two equal lengths of 6 feet on either side of your needle. You will have to repeat this process several times, but any longer, the yarn gets really tangled.


Step three: Holding your two cardboard circles together, push your needle down through the center hole – all the way through until the end. Grab hold of the end of the yarn, and wrap your needle around the outside of the cardboard circles, and push it back down through the hole. Repeat this process around the cardboard circles until you run out of yarn. Then, repeat steps two and three until your center hole is “full”. Don’t worry about stray ends; they become part of the pom.


Step four: Cutting. Take your scissors and around the outside of the pom, cut your strands. I recommend holding the pom tightly during this process. Mine don’t usually go anywhere, but you never know.


Step five: Taking a strand (I usually make mine pretty long), carefully pull apart your cardboard disks – SLIGHTLY. Wrap your strand of yarn around the center of the pom, between the disks. Tie very tightly (but don’t snap your yarn!)


Step six: Gently pull the cardboard disks off. This takes some working, and if need be, don’t be afraid to carefully make a cut from the outside of the disk to the center. That’s the nice thing about using cardboard.


Step seven: Fluff and trim! Using your scissors, give your pom a hair cut to make it even.


Step eight: If you used a long strand of yarn, then make a little knot near the end and you can hang it on your tree, tie it on your package, or do whatever you like, as is! Or, if you’re using them for a different type of project, simply trim the strands even with the ball! These are terrific for households with little kids - no ornament breakage.


Whoo hooo! Do a happy dance because…. YOU’RE DONE!


Other Projects... Non Christmas (i.e. FOR ME!)

Since the holiday rush is done and over at our house... I got everything done a week before Christmas!  Yippee for me!  Now, I've decided to take the rest of December and make things for me (and maybe a couple Etsy quickies... the shop is pretty bare).  There are a few things that I have been planning for a while that I just haven't gotten to.  I have a few custom orders waiting in the wings, but they know I'm taking two weeks for me.  :)  It helps when they are your aunt and a friend you've had for almost a decade!

Okay, so I needed some new jammies pretty badly. I usually buy them about once every five years or so... yeah, really.  This time though, instead of blowing $30 on one set of the Nick and Nora ones that I love, I went and found these two AWESOME fabrics at JoAnn's.  Not the gnomies I was trying to replace, but I am totally okay with Superman and  some little owls.  This way I have either Super awesome dreams about being a superhero... or I pay homage to my favorite owl, Hedwig!  :)

And now the exciting news:  MY FIRST PAIR OF SOCKS!  I've been knitting for almost ten years, but only seriously for about the last three or four. I've been really impressed with how far I've come along, but for some reason, socks just seemed really daunting to me.  I'm glad I found the pattern I did.  It made sense, was simple, and was also forgiving.  It called for a size two needle, I only had a three, and it came out just fine.  :)  (I, of course, then promptly went out and got the twos for my next sock project, that is currently in progress)

Rarely do I actually use the yarn that the pattern calls for, let alone in the same colorway, but this one actually turned out to be an easy pattern that was advertised on the label... go figure.  Anyway, these were done with the Red Heart Heart and Sole with Aloe in Razzle Dazzle.  A self striping and self patterning yarn, these went a lot faster than I was expecting and I am thrilled with the results... I love funsie socks.  :)

Tuesday, December 14, 2010

Lion Brand Projects

So, as much as I love shopping at my LYS (any one of the 6 that I frequent) there is a Michaels about 3 minutes away from my house and, well, they have coupons.  One of the ways I keep my prices low is that, well, I'm kind of... cheap.  Okay, let's rephrase that.  How about thrifty?  I am always on the look out for a great deal - even when I am shopping at an LYS.  (I can say that all of my Christmas presents are either handmade or from local merchants).  The reason that I like the Lion Brand line of products is because while on the inexpensive side, they are also good quality.  That allows me to create some pretty cool stuff, while not breaking the bank.

Two of the projects that I have been working on this week have been a set of French Press Knit's Felted slippers and also a scarf for a repeat client who I went to Junior High and High School with.

Project number one... French Press' felted slippers.  Very rarely do I pay for individual patterns - I'll go and get a book that has something similar in it instead, but this one (and it's great reviews) got me.  It's super fast to knit up, and looks like it took forever!  I'm not the world's greatest (or most experienced) felter, but even for me, these came out pretty good!  Unfortunately, I'm a dingbat and forgot to take a "All the way done, with the button, and non-slip stuff on the bottoms" picture... but, here's the process shots!

Strings tied to the front, and a different one tied to the left slipper
I used the Lion Brand Fisherman's Wool in the solid brown, but I think that any of those colors would have looked great.  I really like how this particular product felts up, and really, the whole felting process only took about 20 minutes.  Total estimated time on this project?  About three and a half hours.  TOTALLY worth the seven dollars I paid for the pattern!


The second project of this week (so far - welcome to Christmas crafting, right?) is this totally cute scarf.  I had a version of this up on Etsy last winter with a portion of the proceeds being donated to Autism Speaks.  This year, I'm doing something a little bit different and making a bunch of goodies for an organization called "Warmth for All".  In any event, these particular scarves are made from the Lion Brand Homespun collection.  I like this particular yarn because it is soft, and because it is a synthetic, it has very easy care guidelines.  This scarf is created using a seed/moss stitch as the base and has a cable running along one side to give it an asymmetrical detail.  Slightly cooler than just your basic scarf, but not crazy difficult to accomplish either.  I will be putting this up as a pattern later this week.

Cable detailing

So, in the meantime... I still have several knit projects left to finish before the big day.... however, right now, I'm off to spend some time with my sewing machine making some bags for another sister in law's family...

Tuesday, November 30, 2010

That Ravelry Account

I went on Ravelry today with the intent of updating and adding some projects that have been done for a while.  I added one.  One.  I had about 15 (at least) to add.  Instead, I wound up playing around, looking at other people's finished objects, works in progress, seeing how many people had made the patterns that I had posted...


On that note, congrats to Ravelry, which was voted best social media site... at this point, over a million fiber freaks can't be wrong!  Although there are many different types of social media that I belong to, both personally as well as through my Kusala venture (Facebook, Twitter, Flickr, Blogs, Etsypreneur - which is new, and really cool), the reason that I enjoy Ravelry is that it is basically one stop shopping.  Yes, while there are links to blogs, Etsy sites, etc., everything is conveniently located in one spot.

I will do more later about social media in general, but for now... off to work on those slippers... you know, that pattern that I also bought while on Ravelry.com today.  :)

Saturday, November 20, 2010

The Blue Moon Fiber Arts Sale (a.k.a Where I spent WAY too much money today!)

Waiting, Shopping and Pretty Pretty Yarn
Thanks (or not ;)) to my Twitter pal - @knitluck - I spent money today, and I could have spent a LOT more.  As in I spent just over $70 and I could have easily spent about $500.  Easily.  And been stocked up with yarn for the next two years. 

Where on earth did I spend so much money on YARN?  Well, at a good LYS, that would have been easy.  Really easy, and I would have probably walked out of there with enough yarn for two projects.  I walked out of the Blue Moon Fiber Arts sale today with enough for a sweater for me, a sweater for my oldest son, and about 4 hats - if not more. 

What I Got! 

Located at a super cute B&B (The Scappoose Creek Inn) in Scappoose, OR. (about 20 minutes outside of Portland), the "Barn Sale" started at 10 and lasted just a few short hours.  We arrived at 9:45, and there were already over a dozen people in line, and they had been there for a while.  Rumor had it that at one point, they were throwing out freebies.  Too bad it took forever to get coffee this morning - that could have been me!

Overall, the sale was well organized for what it was - lots of various colored yarns in tons of different weights, textures, as well as some spinning wool.  We only got a few things, but I saw a number of people with what had to have been piles totalling close to two and three hundred dollars.  The people were friendly and let me take pictures, which was really nice of them - not everyone would!


Ethan, his new sweater, and Ibrahim - our awesome Zipcar

We thoroughly enjoyed our drive out in our Zipcar and it was a nice way to spend a rainy morning!  (And now, to finish all of this Christmas nonsense so I can get started on my new sweater!!)

Sugar Me: A Holiday Shopping Affair


A collage of armwarmers!

As some of you know, I've been working really hard the past two weeks on a custom order... and the kids haven't been exactly what you'd call "cooperative".  So I was really nervous about getting everything done in time for the Holiday shopping event at Sugar Me.

 I got the vast majority of stuff done... minus one pair of armwarmers and the freebie candle holders I was going to do as well.  (It will be done and delivered on Monday...) I am happy to report that there were a LOT of people that came by and had a good time shopping from a great selection of local merchants and artisans! (I personally got a pair of socks for Xavier's speech teacher, and a pair of socks for me - from Santa)

Sugar Me - Holiday Shopping Affair
Pictured to the right are some of the photos I took, including jewlery from LiuLiu Designs (You can see more of her work here) and be sure to check out the design and staging abilities of the ladies from This & That Design, who made the awesome table displays, as well as the windows and the yummmmmmy cupcakes!  It was really nice to meet with some of Kate's clients as well as some of the other gals who work with her!

Wednesday, November 17, 2010

Not Holiday Projects... but perhaps something better.


Alright, since the ladies at The Bitter Baking Co. were kind enough to give me a vanity post... I thought I would do the same - I like to share the love.  :)


Not long ago, I was making an Etsy treasury for the zillion pregnant people that I know... okay, maybe not a zillion, but if you look at my feed on Facebook, it certainly seems that way.  I came across these fantastically awesome cookies with fun (and raunchy, and some oh-so-wrong) little sayings on them.  Things about baby daddies, and Twilight halloween costumes, and some others that, well, I'll let you take a look, which I highly recommend, because they're AWESOME - like I said.

Not only do they have the fun and raunchy ones, but they also have their "Sweet Sayings" collection which would be more appropriate for say, your stuffy boss that you know you should get something for, but somehow the "Everyone knows what you do in the Break Room" cookie isn't going to quite work.  AND, they also have partnered with the Camaraderie Foundation  through True Blue Treats which helps troops transition (I really wanted to use re-assimilate, but that sounds like their rejoining society after being a part of the Borg) back into civilian life.  Coming from a military family, I can certainly understand the importance of this particular organization.

Anyhooo, long story short, now we're Twitter friendsies. I can't believe the number of really cool people I have met using Twitter... there will be another post about that next week - and social media in general.  For now, I HIGHLY encourage you to go - NOW (okay, finish reading this first) to their site: http://www.bitterbakingco.com/ and check them out - you can also find them on Twitter, as well as on Etsy.  And just in case you need this one after Holiday break for that really classy girl at the end of the dorm room hall... it's available.  ;)

Something New!

I was ready for a change!  I love the deep greens and reds and twinkling lights of this time of year, but I don't need Santas, Snowmen, and Rudolph.  Check out the new look, and I will have a longer post up this weekend featuring some of the things that I'm working on for the holidays!

Wednesday, November 3, 2010

Drowning in Custom Orders!

And I like it!  Even though my hands are killing me, I have no time to clean my house, and I'm starting to stress about getting new items up on Etsy... custom orders means that money is coming in!  I got a cool new book the other day with a bunch of patterns for cute little stuffed animals and some AWESOME slippers!

Right now, I'm working on an order for a friend in New York - you'd recognize her from the Kusala logo box on the right.  She was my model from last fall/winter season.  There's a hat, a cowl, a set of foldover mittens, and a viking hat and foldover mittens for her pre-schooler... almost done! I just have the horns left to work on and the linings for the mittens.  I'm thinking these mittens are going to be great Christmas presents for the guys in our families!

Next up: another viking hat for Xavier's speech therapy supervisor and some adorable little doggie jackets!

Friday, October 22, 2010

Where Have I been? Sheesh...

I know that all six of you wait with baited breath for each new blog post that I write, but it helps clear my head and gives my fingers a different type of exercise than what they get from playing with needles and yarn.  :)

So.  What have I been up to lately?  Well.... I met with the lovely Kate Sprouse, owner of the sugaring shop, Sugar Me  in Northeast Portland and she decided to include some of my items in her super cool shop.  Let's get down to basics before we talk about the yarn...

What on earth is sugaring?  Well, think waxing, but without the super hot wax or chemicals.  Anything that can be waxed can be sugared, and well, I would think that it would also be slightly less painful.  Also, on the upside, sugaring doesn't require the length of hair growth that waxing does either.  Cool, right?

Located in the super cool neighborhood in Portland, don't be thrown off by the "NE Portland" address.  Near Acadia Bistro, as well as Caffe Destino, New Seasons, a Starbucks and various others, Sugar Me fits in well with it's surroundings.  The community feeling of the area also seems to be working for Kate, who had said that the local merchants and businesses are all very supportive of each other.  (Some of you MAY remember this particular area as having been home to the original Peanut Butter & Ellie's, back in the day... okay, it wasn't really that long ago, but they did close, sadly.)

Back to the yarn... once the girlies over at Sugar Me get everything set up how they want, hopefully (you hear that Kate?!?!?! :) ) I will get some pics of my stuff in the shop, but included in the order were six sets of armwarmers in three different designs, six cowls/neckwraps in three different designs, some coffee wraps, a bunch of washcloth soapy bags, as well as some fun little freebies for the sugaring queens.  :)  Multiple colors, sizes, and styles give a great selection and compliment the already existing products of soaps, lotions, and various jewelery.

Never been sugared?  Give 'em a call and try it out!  Also, if you tell me that you went, and can tell me the name of the other girl who works there (Not Kate or Katie - nice try!) I will give you a discount on any Etsy purchase!

Saturday, September 25, 2010

Blocking... and waiting.

Recently, I discovered blocking.  No, not running around with the kids, building towers and knocking them down, though that is a great thing to do while wool is drying ;)

Problem with blocking is that I don't have a blocking board, don't have room for a blocking board, and I don't have blocking pins.  Even if they SAY that it's okay to get them wet, I still have an issue putting metal into something that is wet/damp.  That being said, I DO have an Ikea drying rack and lots of clothespins... so this is what I came up with:
It seems to work pretty well, I just have to be careful on the ends, or I get a ripple effect. This week, also, I've been cramming to get everything done for the big Etsy shop re-vamp for fall/winter, but I took some time out to head up to the Lantern Moon warehouse sale.

I found a totally awesome straw knitting bag, marked down to $12!  It's bright yellow, with some dye uneveness - why it was marked down, but really, I like it that way.  It adds character.  I also got a gorgeous mini-needle roll.  I needed a separate one for my DPN's.  That being said, I always lose track of which set of DPNs is which.  I came up with this plan:  I have a bunch of beads and earring wires, so I threaded the number of beads for each set of DPNs on to separate wires, and voila!  I really like how these came out, and this way I can keep track of which is which without is being totally obnoxious - like keeping the numbers from the packaging. ;)  Here's the finished product after I attached them to the needle roll.  Looking back, I probably should have just done them in complementary colors to the fabric, but I like the colors... easier to count the beads!


Cute, huh?  I like it.  :)  Back to a super cute baby sweater, and some washcloths for my little sis who just left for college!  I remember it was always fun to get random packages in the mail!


Wednesday, September 22, 2010

New projects!

After several requests, I have found a baby bootie pattern that I really like (along with about 3,000) other people...  Slightly different than your normal baby feet, these ones cross over and are super cute (and easy) to knit up. I've done two sets so far:

The first, the ones to the left, are done with a sock weight yarn and a size 3 needle, making them a little on the airy side, but they are knit with a wool/bamboo blend, which keeps them soft and warm. These ones are a little more girly than the others, with shades of blue, green, yellow, and purple - accented with purple buttons.

The second ones are done in a DK weight with size 2.5mm needles and all in blue... great for those who still do the whole blue is for boys thing, but I think they would look just as cute with a little blue and white gingham dress.  :)

I've also been working on a couple of neck wraps, a really cool celtic cable pattern that I found on Ravelry, which I absolutely love.  As well as an adult yoga sock, a sweater for Xavier (which at this point is hibernating, and I might just wind up frogging it, because I don't like the yarn that I was trying to use up.  :(  It's a 100% acrylic, and it just isn't working well with the pattern.  Not to mention that it's really difficult to knit with and is hurting my hands.

No new patterns at the current moment, but I will be putting up some more pictures of the fall Etsy collection soon!

Tuesday, September 14, 2010

A couple mini-projects....

I finished the sweater... and I really like how it came out.  I will definitely make this pattern again.  I will put up pictures of that shortly.

Over the past few days, I have been working on a couple of projects for my fall Etsy collection and also have had another article published on the Naughty Knitterz website regarding the differences between your local LYS and the Big Box craft stores like Michaels and JoAnn fabrics.

The newest project that I've done has been a unisex cowl in a great shade of army/olive green.  I really like how this one came out, and if you like it too, here is the pattern!  Please feel free to make a bunch to share with family and friends, charities too, but please don't sell the pattern.  Thanks!


Easy Unisex Cowl

What you need:
Size 8 circular needle
Worsted weight yarn (in two colors if you want a contrasting band)

What you're going to do:
CO 124 (Note: I've had a comment saying that it didn't work with 124, and changed it to 122, and then received another comment saying that no, 124 was correct.  I did 124 and it was fine.  :))

Join and work in a K2, P2 rib for 5 rounds (or more, if you want a wider banding on it)
Knit 1 round with first yarn type, change to contrast yarn

The majority of this project will be worked in a half-linen stitch.

Pattern Rows:
Round 1: *K1, bring yarn to front, sl 1, bring yarn to back, repeat from * to end of round.
Round 2: Knit.
Round 3: *Bring yarn to front, sl 1, bring yarn to back, k1, repeat from * to end of round.
Round 4: Knit.

Continue these four rounds until cowl reaches desired width.  I did about 5 inches.
Change back to first yarn, Knit 1 round
Work in K2, P2 rib for 5 rounds, Bind off.

This is a super easy pattern that goes very quickly once you get into a rythym.  It results in a loose fitting cowl that slips over the head, with a cool, nubby texture.  Enjoy!

*Disclaimers, etc:  This pattern  (not the stitch pattern) was made up on the fly as I was trying to use up some extra wool yarn from another project.  Any similarity to previously existing patterns is coincidental.  Thanks!*


Thursday, September 9, 2010

A Seemingly Endless Process

Okay, not necessarily endless... I just get impatient easily.  My latest project is something actually for me.  I went into Knit Purl last weekend thinking I would get a nice, neutral charcoal for this particular project... I'm thinking an all around sweater for khakis, jeans, black pants, grey pants, etc.  What did I walk out with?

Image via Malabrigoyarn.com
This lovely worsted weight, kettle dyed Malabrigo yarn.  It's beautiful, with shades of greys and purples and blacks... not what I went in for, but it was SO pretty in the twisty ball, and then as it was wound I could see all of the color variations...

In any event, the sweater pattern that I am working is from LionBrand.com and it is their "Radiant Sweater."  I like this particular pattern because I'm rather small chested, and boat neck sweaters seem to do better on me, as they bring the eye to my face as opposed to the decollete...

Currently, after working on this for three days, I have both sleeves and a little less than half of the body done.  As much as I like the pattern and the yarn, the endless rounds of stockinette are killing me.  I'm trying really hard to stay focused, but sheesh!! 

OH!  And here's an image of the actual sweater... with that, I'm back to the rounds... and some Castle reruns.  I love Nathan Fillion. :)

Wednesday, September 1, 2010

Another Free Coffee Wrap Pattern

I love making these little coffee holders... especially in different sizes and varieties.  My first ones were very simple, and as I've grown in skill, they've become more complex.  I still love my basic coffee wraps that you can find a little farther down on the page, but I've developed several others, the following being one of them!

These work up super quickly and are great for teacher gifts or perfect for that last minute present - think a cute little mug from Ikea, wrap it in a little holder and toss in a gift card or a few packages of the new Starbucks Via instant coffee.

The pattern is simple and is as follows:

You Will Need:
SZ 11 (US) needles
Worsted Weight - Chunky Weight yarn (Either will work just fine)
Cable needle
Tapestry/Yarn needle
Harry Potter Soundtrack (Okay, this item is optional... but certainly preferred)

Explanation of Stitch:
C4F:  Slip 2 stitches onto cable needle, let hang in front of work, knit next 2 stitches, then knit 2 off of the cable needle, proceed with rest of row.
Pattern:
CO 14 stitches
R1: P1, K2, P2, K4, P2, K2, P1
R2: K1, P2, K2, P4, K2, P2, K1
Continue until R7
R7: P1, K2, P2, C4F, P2, K2, P1

Repeat these stitches until wrap is nearly desired length - after last R7, continue R1 and R2 repeats until R6.  At end of this R6, Knit every stitch for the next two rows.  COff/BOff using your preferred method - I really like the sewn cast off, which you can find here, at Knitting Daily.

I can't crochet.  I keep meaning to learn, but until then, I stitch a button on the COn edge. Then I take either a piece of yarn or ribbon, make a circle and make a knot through the BOff edge.  See pictures below.  I've found that this works just as well, and looks really cute if you use a contrasting color to the yarn.


Step One: Slip your circle through the work


Step 2Slip the bottom of the loop up through the top part of the loop


Step 3Pull tight, and you're done!  Very simple and easy.  If choosing to use two buttons, just space loops out accordingly along the bound off edge!

Wednesday, August 25, 2010

An Interesting Client Query

This past week has been insanely (but good) busy.  My hands are tired, my head is swimming with projects I need to get done in the next week, and some patterns that I want to put up, and in the midst of all this, one of my clients asked me an interesting question:

"What exactly is Kusala Knitworks out there?  Is it just you?  Do you have a store?"

Sadly, no, no store.  And it's just me... knitting away in front of the computer, or listening to some of the podcasts from howstuffworks.com (these guys are seriously great... I haven't heard a single podcast from them that I haven't liked yet!)

Fortunately, or unfortunately, depending on how you look at it, I live in a city that is alive and thriving with artists and artisans, as well as general all around crafty types.  I would love to have some of my kids accessories (like the little learning to walk socks) in some of the children's boutiques, and some of my knitting notions maybe featured in some of the yarn shops... (hear ye, hear ye, Portland shop owners!)  That being said, the competition around here is pretty cutthroat and unless you know someone...

Right now, I'm content with building a brand that is known for being willing to customize items for clients, whether it be size, shape, or color; as well as being known for great service and quality, regardless of the type of yarn they choose.  Every piece should have the same attention to detail - whether the yarn is a $4.50 ball from JoAnn or a $14.50 skein of sock yarn from Knit Purl.

Tuesday, August 17, 2010

Wow Guys!


I just checked my Google Analytics for yesterday, and I had the most visitors yesterday that I've ever had!  WOW!  Thank you so much for all of the visits!  I know that it has a lot to do with the patterns that I put up on Ravelry, and I hope that y'all like them and can use them extensively.  :)

As someone who has mainly been a writer, this whole knitting thing, while it isn't new (I've been knitting for just about ten years), sometimes it is easier to fall back on something that you know how to do well.  I try to invoke some humor... and perhaps a bit of sarcasm... into my writing.  Even if it is about knitting, yarn, and the stupid needles that make my hands hurt!

Again, thank you all very much, and I encourage you to check out my Etsy site for some really cool, recycled notions for your knitting!  My son calls them "Knitting Jewelry".

Monday, August 16, 2010

Two Other things for Today....

I love when my Etsy site gets random clients.  It makes me happy.  Especially when after they purchase something from me, they then decide to order more!  I like a) selling things, obviously but b) I like finding and trying and modifing other patterns.  For example... here is another freebie pattern that I am offering up.  It is a single cable scarf, done in a Super Chunky [6] yarn on size 13 needles.  You can find the story behind it on the actual .pdf, but suffice it to say, I am getting better at this pattern stuff!  :)

Single Cable Chunky Pull through Scarf - Level: Advanced Beginner (due to cables)


This is a take off on the Lion Brand Pattern “His & Hers Easy Cabled Scarves” that can be found in their “University Knits” booklet. I didn’t like how wide the scarf turned out for the women’s version, I also like my cables spaced closer together. The original pattern calls for fringe at the end, which I don’t include, but you are welcome to add. I also added the pull through, merely because with a super bulky yarn, it can get hard to tie under jackets. This is also easily scaleable for a child – just use a worsted weight and smaller needles…

A few abbreviations to know:

C6F – Slide the next three stitches to a cable needle, let it lay in front of your work, knit the next three stitches, then knit the stitches off of the cable needle.

Materials:

Size 13 or 15 (US) needles

Your favorite Super Bulky [6] yarn… this one is pictured in the Lion Brand Hometown USA yarn, but will also work with everything from a Malabrigo Super Chunky to a super chunky organic cotton (all depends on how much you want to spend).

Alright, Alright! Here are the instructions:

CO 18

Odd Rows 1-7: P2, K2, P2, K6, P2, K2, P2

Even Rows 2-8: K2, P2, K2, P6, K2, P2, K2

Row 9: P2, K2, P2, C6F, P2, K2, P2

Row 10: Same as Even Rows

To Make Pull Through (close up pictured at right):

After 5 pattern repeats, work rows 1-4.

On Row 5: P2, K2, P2, BO 6, P2, K2, P2

Row 6: K2, P2, K2, CO 6, K2, P2, K2

Continue with rest of pattern repeat

After Pull Through is completed, continue pattern repeats until scarf reaches desired length, BO in pattern (I’ve found it looks the best if you BO on a row 6 – then there is half a cable repeat, just like at the beginning), and weave in ends.

Notes, Disclaimers, etc.:

I am not claiming this as a completely original work. I have merely altered it from an existing pattern that wasn’t to my satisfaction. Please do not sell this pattern, as the original is available from Lion Brand, although you are certainly welcome to sell objects made from it, as stated on their site. I would appreciate if you give me or my blog a shout out, should you choose to use it. Thanks and enjoy!


The other thing for today, I put these little stitch markers up on Etsy last week, and oddly haven't really gotten much interest in them... I can't imagine why, as they are AWESOME and really not expensive at all!  Check out the full details on the Etsy site by clicking here.

A New Freebie!

The other day, I found a shirt in the closet that I got for my husband over a year ago.  He hasn't worn it - not once... so, I decided to modify it to fit me.  Good thing that I can sew too!  :)  That being said, it is a navy blue mechanic's style shirt with a red and white design on the back and even though I love my Yankee ballcap, I get tired of wearing hats all the time.  (I'm attempting to grow my hair out)  I decided a red headband would look super spiffy with a red tank top underneath... I even painted my fingernails red.  I have OCD - can you tell?

I love patterns that are short, quick, and useful... so here is another freebie!  :)


The Thirty Minute Headband – Level: Beginner


This is a quick and easy, beginner level knit, using a moss stitch. It should take between 30 minutes and an hour, depending on the size of the head you are knitting it for!

A few abbreviations to know:

M1 – make an additional stitch by picking up the “bridge” between your right and left needles and pull up to the left needle, then knit as you would any other stitch. This is an easy increase stitch. Not working for you? No worries, just use your favorite increase method!

K2tog – knit two stitches together. Instead of sliding your right needle through one stitch on your left needle, just slide it through two! This is a super easy decrease stitch.

Materials:

Size 7 (US) needles

Your favorite cotton or cotton blend (Lion Cotton, Sugar n Cream, Cotton Ease) yarn. I use cotton for this project because of the ease of care.

Enough Already! Here are the instructions:

CO 3

Knit these three stitches back and forth in garter stitch for approximately 6”

First Increase Row: K1, M1, K1, M1, K1

Row 2,3,4: Knit

Row 5: K1, M1, K3, M1, K1

Row 6,7: Knit

Row 8: K1, M1, K5, M1, K1

Row 9: Knit

Pattern row: k1, p1, k1, p1, k1, p1, k1, p1, k1

Continue Pattern row for about 12”… or as long as you need, depending on head size.

Prep Row for Decreases: Knit

First Decrease Row: K1, k2tog, k5, k2tog, k1

Row 2,3: Knit

Row 4: K1, k2tog, k3, k2tog, k1

Row 5,6,7: Knit

Row 8: K1, k2tog, k1, k2tog, k1

This will give you three stitches remaining on your needle. As with the first tie, knit for approximately 6”, or to size of your head.


Notes, Disclaimers, etc.: This was made up on the spur of the moment because I needed a red headband. If it resembles anything else out there, it isn’t intentional. I don’t care if you make these for sale on Etsy or craft fairs, or fundraisers, however, please don’t sell the pattern, and give me credit (Kusala Knitworks) for the pattern content.

Thursday, August 5, 2010

A few weeks later...

A few weeks ago, I had written that I was nervous about writing my own patterns.  Well, I can't say that I have overcome that... not even close.  SO.  Instead of worrying about that, I decided to start with something a little easier.  I have managed to convert a fairly simple free cabled hat pattern from Bernat to a "knit in the round" pattern.  It is coming along pretty well, and I'm hoping to have it done tonight.

I have begun enlisting the Kusala legion... I have discovered a loyal fan in Pittsburg who has ordered several things from the Etsy site, as well as enlisting a custom order from me - for two hats!  Those were completed last week and received today!  They love them and I am very excited to have fans across the country. 

I have also been working on some designs... i.e. I take patterns and modify them to make them mine... :)  and I have come up with this cute little cabled pull through scarflette...  It is PERFECT for when you are chilly at work, but can't have the length of a full on scarf to get in the way of typing or writing.

One of my goals is to get put in a few more shops.  I made a connection with a knit shop in North Portland the other day about the cool end stoppers that I had made, and I need to see how that is going to pan out... I need to email her.

I'm working on the Fall/Winter collection for Etsy and hopefully will have more pics to post soon!

Thursday, July 22, 2010

Conversion of Flat patterns to "In the Round"

Yesterday I wrote about how I am horrible at writing patterns.  Like really bad.  So, I thought to myself, perhaps I shall find one that I can convert first, and try my hand at that.  After researching a little bit, I found that the "wrong side" row needs to be opposite of what it is on a flat pattern... so if the wrong side row is k1, p1, in the round it would be p1, k1.  Makes sense when I say it... but applying it is another matter.  I'm thinking I'm going to have to chart it out before I actually try to do it...

Wednesday, July 21, 2010

Writing My Own...

One of the things that I am becoming increasingly frustrated with is my inability to write my own patterns.  I can modify other people's patterns, I can figure out (easily, I might add) how to alter the weight and needle size to figure out a smaller or larger size.  However, for whatever reason, I have a serious problem writing my own.  I can take a lace pattern that I've found in a book and turn it into armwarmers or a scarf or placemats or something like that, but I don't necessarily consider that "making my own pattern". 

I have a feeling that this is going to become increasingly irritating and I think I'm going to have to find a book about it.  However, should anyone come across this that has any suggestions, or a good reference book, PLEASE let me know.  I would be very grateful!

Saturday, July 17, 2010

Cool New Stuff!

Alright, so it's been a bit since I've written, and it is because I've been working on these:


Totally cool, right?  They are needle stoppers made from corks that I have collected and decided, "Hey.  This would work!"  I went looking for stoppers after my youngest pulled one too many projects from my needles and I was ready to... well, you know.  Scream.  Yeah, scream.  :) 

I have about ten sets of ten stoppers available on the Etsy site in different fonts and different papers.  They're sealed on the ends and use either real cork or the synthetic variety.  Check 'em out by clicking here, or you can also use the link in the upper right corner of the blog!

Friday, July 2, 2010

Cables... Part 2

HOLY COW!!!!  I DID IT!!!!  Alright, for someone that is kind of a grammar freak, that was a little excessive.  But, I'm really excited!  I finished my very first cabled hat!  And it turned out right!  And I love it!  It is a SWEET shade of dark orange, done in Patons Classic wool, and it's fantastic.  I'm making my Christmas lists early this year, and I can think of about six people who are going to get this identical hat.  :)  I did also find another pattern that is a little more "guy friendly", with a few fewer cables that will go out to a few different gentlemen that I know.  That pattern will probably go up on the Etsy site, whereas this one has a disclaimer that it isn't for commercial use... sadsies. 

I wish I was better at patterns, I'm just not, so it puts me in a quandary when I'm looking for patterns that I can use to make saleable goods. Oh well, back to the excitement!!  Here is another pic!

Cables.

So, at first, I was scared of cables.  It seems as though I am a fan of self doubt, because every time I put off trying something new, as soon as I do it, I say to myself, "hmm.  That wasn't really that bad.  At All."  Which, I suppose, is a good thing.

My first attempt at a cable project was this totally awesome little bib, that I wound up making in several colors for a friend of mine in Virginia.  We were friends when we were six and seven years old and reconnected through Facebook.  (Thanks, guys!) I did these in a few unisex shades, because I think baby blue is boring.  Even if it is for a little boy!  I also figured that she was going to have more than enough newborn goodies to start out with, and I wanted to make something that would be good for a time down the road.

I like how the colorway pooled on the multi-colored one, and how it doesn't necessarily detract from the cable.  Granted, it is easier to see the cable on the solids, but I wanted to do a variety. 
The next project that I've started involves practicing cables.  Lots and Lots of cables.  I'm thinking this winter's collection is going to be involving almost all cables.  :)  Now that I've found a new skill, we'll see how it goes.  I have half of the first hat done... not only involving cables, but also circular needles.  I think I might have a death wish!  This one is done in a simple burnt orange wool, and I'm looking forward to having pics up soon.

Next up: (well, when I get tired of the cables, anyway) SOCKS!  I've been looking at some patterns, and they seem rather daunting.  I think I just have to pick up the DPN's and just dive in.  I can always undo it and start over, right?

Thursday, July 1, 2010

Another freebie...

This pattern is listed in various places, in about a million different ways, but, because I'm a fan of sharing freebies... here goes...

Simple Dishcloth with Eyelet Border


Size 7 or 8 needles
Cast on 4 stitches
Row 1: Knit
Row 2: K2, YO, knit rest of row.
Row 3 on: Repeat Row 2 until desired size.  I've found that 40 sts is a good in-between size
Decrease Rows:
Row 1: K2, YO, K2tog, K2tog, K rest of row.
Row 2: Repeat Row 1
Row 3: Repeat Rows 1 and 2 until there are 4 sts remaining.  (This can be varied... if it starts to look too "pointy" on the end, BO sooner)
BO, weave in ends.

I've found that the Sugar n' Cream, while it works great for these, has a tendancy to bleed.  A lot.  So if you give them as gifts in a color other than natural or white, warn the recipient to soak it in cold salt water to prevent bleeding.  :)